Basics of Closed Loops
The electrical concept your child will learn while doing this activity is that in order for current to flow, the circuit has to form a complete or closed loop. The object of the game is to NOT close the circuit, because if the wires touch and the circuit is complete, the LED will light up. The winner is the person who can take the loop from one end of the curved wire to the other without causing the light to light up.
Electronics
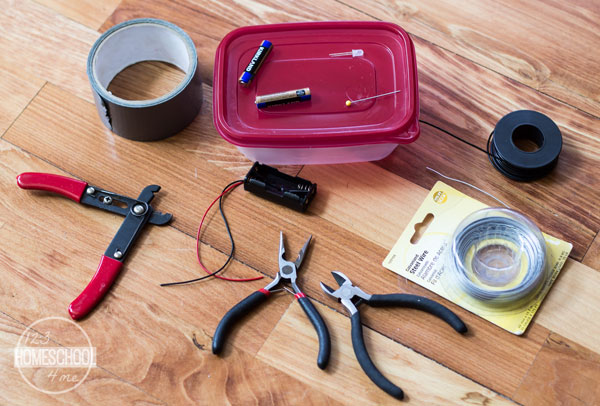
Materials:
- Empty container (we used a deli meat container, but any container with a lid including a small shoebox would work.)
- 2 AAA battery holder
- 2 AAA batteries
- LED (we used white, but you could use any color)
- pin or other sharp object for poking holes in lid
- stiff, unshielded wire (we used 20 gauge galvanized steel, but could use a coat hanger or other stiff wire)
- flexible, shielded wire (we used 22 gauge hook-up wire since that's what we had on hand, but the game would definitely be less challenging with slightly more flexible (higher gauge) wire)
- duct tape (or other strong tape)
- wire strippers
- wire cutters
- needle nose pliers
Electronics Project for Kids
- First, use your pin to make small holes on either side of the lid. Cut off a piece of stiff wire and feed it through the holes making a wiggly, curvy design on top of the lid such as the one shown.
- Use your pin to make two small holes near each other wherever you would like to place your LED light. Feed the LED legs through the holes.
- Use your needle nose pliers to attach the battery holder to the connections for the curvy wire and the LED on the underside of the lid. Since the LED is directional, you will first want to check that you are attaching the correct battery lead to the correct LED lead by touching the battery leads directly to the LED leads. In my case, the red lead of the battery pack needed to be attached to the long lead of the LED.
- Bend the connections flush with the lid and use duct tape to secure them.
- Use your pin to poke a hole in the lid where you would like to place the flexible wire with the loop that the player will control while playing the game.
- Cut a piece of flexible wire long enough to attach to the LED on the underside, come through the hole, and move across the entire curvy wire. Use your wire strippers to strip the portion that will attach to the underside of the lid.
- Thread the portion of the wire with the shield stripped off through the hole on the top of the lid and use the needle nose pliers to bend the wire around the remaining, unused LED lead. Secure with duct tape.
- Strip some of the shielding off the other end of the flexible wire on the top side of the lid and use your fingers to form this potion into a circular loop.
- Lastly, connect the loop to the curvy wire. When the loop touches the wire, the LED should light up. When it is held in such a way that there is no connection, the light should stay off.
Once your game is complete, your kids can take turns trying to guide the circular loop of wire over the wiggly wire. I should warn you that this is a pretty difficult task with a loop the size pictured. My preschooler and kindergartner had a lot of fun trying, but were not able to make it from one end to the other without lighting up the LED. Even I had a hard time. However, the difficulty of this game is easily adjusted by making the circular loop bigger or smaller.
Be sure to have older kids think about how this game works. Why does the light shine only when someone's hands aren't steady enough? Hopefully older kids will realize that this connection is actually completing a current loop. If not, have your child trace out the path of the wires with their finger so that they can see how the circuit forms a complete, connected circle only when the wire loop touches the wavy path. Have fun watching your child learn about and explore electricity!
Science for Kids
- Animal Report Forms
- Animal Home Clipcards
- Crystals - How to Grow Crystals
- Dancing Raisins Experiment
- How to Make a Lava Lamp
- Why do Leaves Change Colors
- Homemade Battery Experiment
- Pop Rock Science Experiment
- Simple Machines Mini Book
- Solar System Worksheets
- Squishy Circuits
- Weather Unit (free printable unit)
- Homemade Weather Vane & Compass Activity
Michelle is a homeschooling mama of 3 young kiddos and a former engineer and research scientist. She blogs at Research Parent, an education-focused website featuring free printable learning material and activities for K-12. Follow along on Pinterest, Facebook, Instagram, and Twitter


